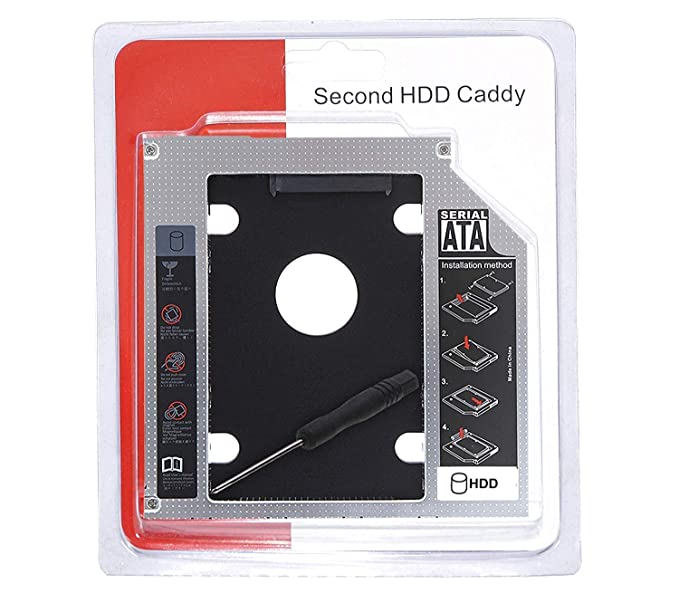
Description
SATA Bay 2nd Hard Disk Drive Caddy for 9.5mm CD/DVD Drive Slot(Add Second HDD/SSD to Your Laptop) caddy for hdd
- Compatibility Check: Ensure that the SSD caddy you choose is compatible with your laptop model. Different laptops may require specific caddy sizes and connectors.
- Tools: Gather the necessary tools, such as screwdrivers and an anti-static wrist strap, to safely install the SSD caddy.
- Backup Data: Before starting the installation, back up all your data from the existing hard drive to prevent data loss during the transfer.
- Power Off: Power off your laptop and disconnect it from any power source. Remove the laptop battery if possible.
- Open the Laptop: Open your laptop’s case. This may involve removing screws and opening panels, so refer to your laptop’s user manual for guidance.
- Locate the Optical Drive Bay: Identify the optical drive bay in your laptop where the SSD caddy will be installed. This may require removing the optical drive.
- Install the SSD: Carefully attach the SSD to the caddy, ensuring it is securely in place. Use any included screws to fasten it if needed.
- Connect the SATA Cable: Connect the SATA data cable from the SSD caddy to the laptop’s motherboard. Make sure it’s securely connected.
- Connect the Power Cable: If required, connect the SATA power cable to the SSD caddy. Some caddies may draw power directly from the laptop.
- Secure the Caddy: Securely mount the SSD caddy in the optical drive bay, aligning it with any screw holes. Tighten any screws to hold it in place.
- Reassemble: If you removed any panels or components to access the optical drive bay, reassemble the laptop in reverse order.
- Boot Up: Power on your laptop. The SSD should be recognized as a new drive. You may need to initialize and format it in your operating system.
- Transfer Data: Restore your backed-up data to the new SSD or install a fresh operating system, depending on your requirements.
- Optical Drive Conversion: If you replaced the optical drive with the SSD caddy, consider an external optical drive if needed.
- Testing: Test the SSD for proper functionality and ensure that your laptop recognizes it as the primary storage device.
- Secure the Caddy: Ensure that the SSD caddy is securely in place and that no loose screws or cables are interfering with the laptop’s operation.
- Optimize for SSD: In your operating system settings, enable SSD optimization features like TRIM (for Windows) or equivalent settings for your OS.
- Regular Backups: Continue to maintain regular backups to protect your data.
Remember that SSD caddy installation may vary depending on your laptop’s make and model, so always consult your laptop’s user manual or seek professional assistance if you are uncertain about any step in the process.
Check out other product:- refurbished laptops under 10000 | used refurbished lenovo 3rd gen | second hand Refurbished lenovo I3 | Refurbished Dell 5400
FAQs-
1. Q: What is a Caddy HDD, and why do I need one?
A: A Caddy HDD, or Hard Drive Caddy, is a device that allows you to add an additional hard drive to your laptop or desktop. It’s useful for expanding storage capacity without replacing your existing drive.
2. Q: How do I know if a Caddy HDD is compatible with my laptop?
A: Check the specifications of your laptop and the Caddy HDD. Ensure that the Caddy supports the same drive size (e.g., 2.5 inches) and connection type (e.g., SATA). Compatibility information is usually provided by the manufacturer.
3. Q: Can I use any hard drive with a Caddy, or are there specific requirements?
A: Most Caddy HDDs support standard 2.5-inch SATA hard drives. Ensure the drive’s thickness matches the Caddy specifications. Additionally, some models may have limitations on maximum capacity, so check for compatibility before purchase.
4. Q: How do I install a Caddy HDD in my laptop or desktop?
A: Installation is generally straightforward. Remove your laptop’s optical drive (if applicable), insert the Caddy with the new HDD, secure it in place, and connect the necessary cables. For desktops, installation is similar, usually involving an available drive bay.
5. Q: Where can I buy a Caddy HDD, and what should I consider when purchasing one?
A: You can find Caddy HDDs online or at electronics retailers. Consider factors such as compatibility with your laptop, build quality, and customer reviews. Ensure the Caddy has the necessary screws and tools for installation, and check the return policy to address any unforeseen issues.
Reviews
There are no reviews yet.